Group Management
Administrators can manage their organizations, teams, and groups on the Manage Group page. To access your Manage Group page via the main navigation bar at the top of your Home page:
- Click Manage then Schools/Offices/Groups (display words vary depending upon your organization or group type) OR
- Click Groups
Note: If you are the administrator of more than one same-level group within an organization, you’ll be taken to the Select Parent Group page next, where you can select the group tree you’d like to manage.
Organizing Members
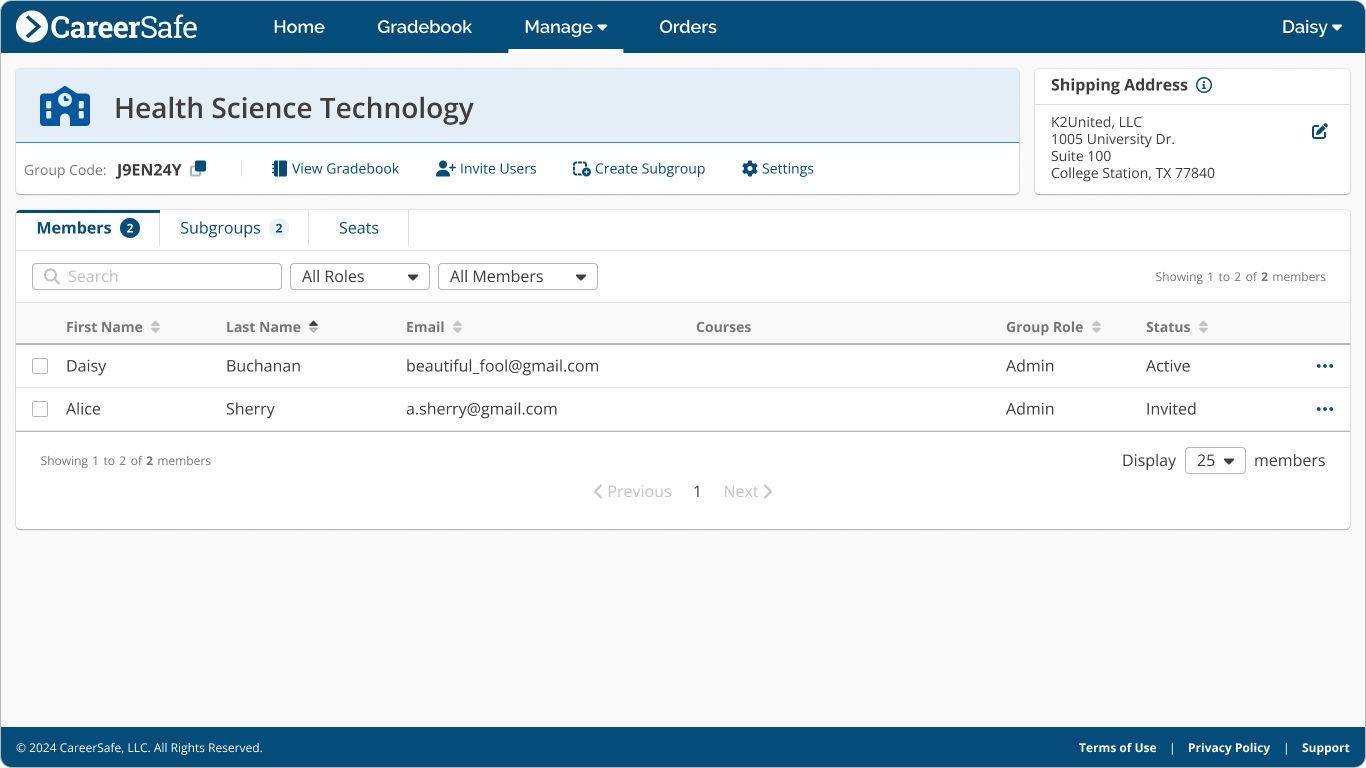
Users who are added to an organization or group become members of that group. When you add members, you can assign them either a Student role or an Admin role.
- Admins can configure group settings, manage group membership, enroll members in courses, and view the associated Gradebook.
- Students can only take training and have no group management privileges.
How do I create a subgroup?
From the Manage Group page, click the Create Subgroup button in the Group Detail Card, then follow the steps below.
- Select a Group Admin (yourself, another existing member of the organization, or a new member you create), then click Continue.
- Choose your group’s settings, then click Continue.
- Type determines your group’s display icon and helps with organizing groups.
- Name is what you want to call the group. This field is automatically populated with the first and last name of the Group Admin, but you can change it.
- Abbreviation is a shortened version of the group name that will be used in places where space is limited (i.e., mobile view). This field is automatically populated with the first and last initial of the Group Admin, but you can choose whatever abbreviation you want (up to 5 characters).
- Color determines the display color of the group and can be adjusted to your personal preference to help with easy identification.
- Review and confirm (or edit) the Shipping Address for the group, then click Create.
Note: This address is where any OSHA cards earned by group members will be shipped. Review it carefully to ensure your group members’ cards are sent to the correct address. - If you have chosen yourself as Group Admin, you’ll see a message letting you know that your group has been created and providing a Group Code you can share to add members to your group.
- If you have selected another user as Group Admin, you’ll see a message confirming that the group has been created and an email has been sent to that user with further instructions.
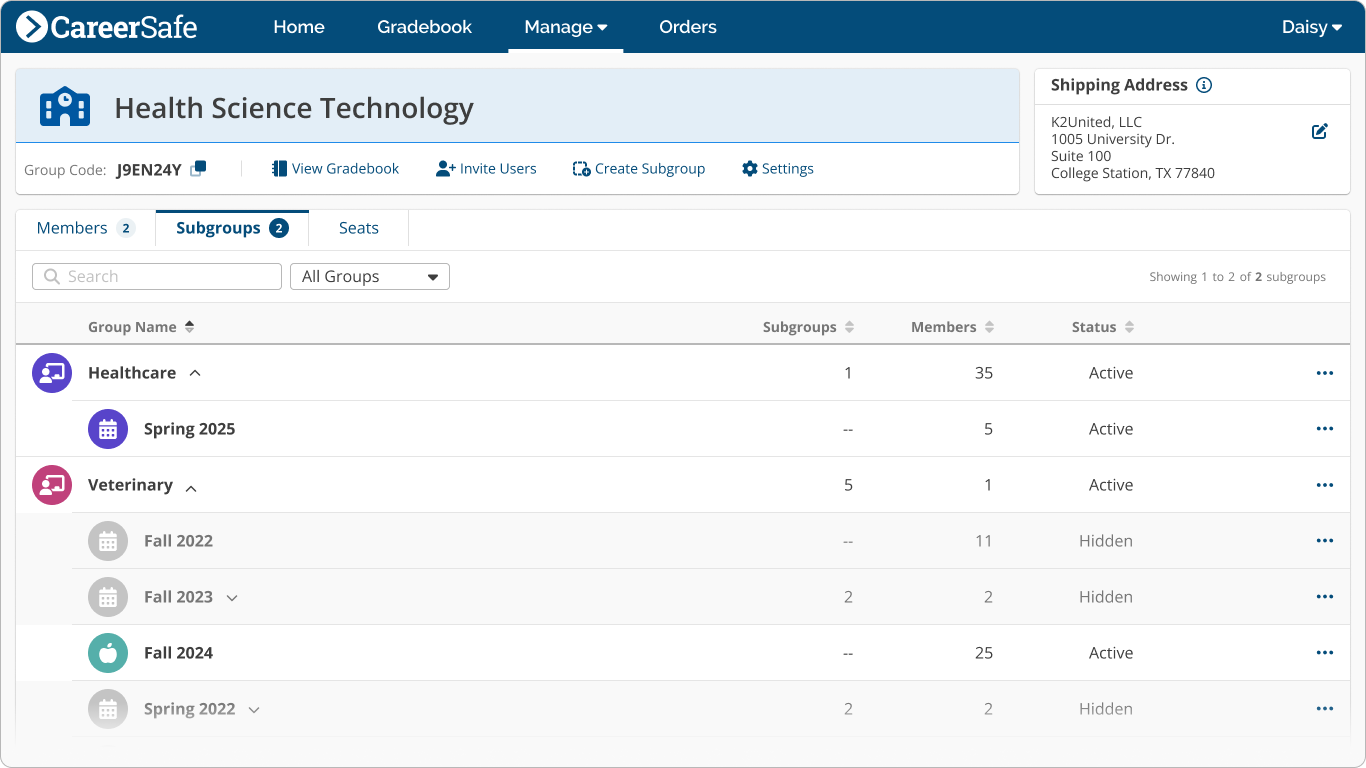
Once you’ve created a subgroup, it will appear in your Subgroups Tab.
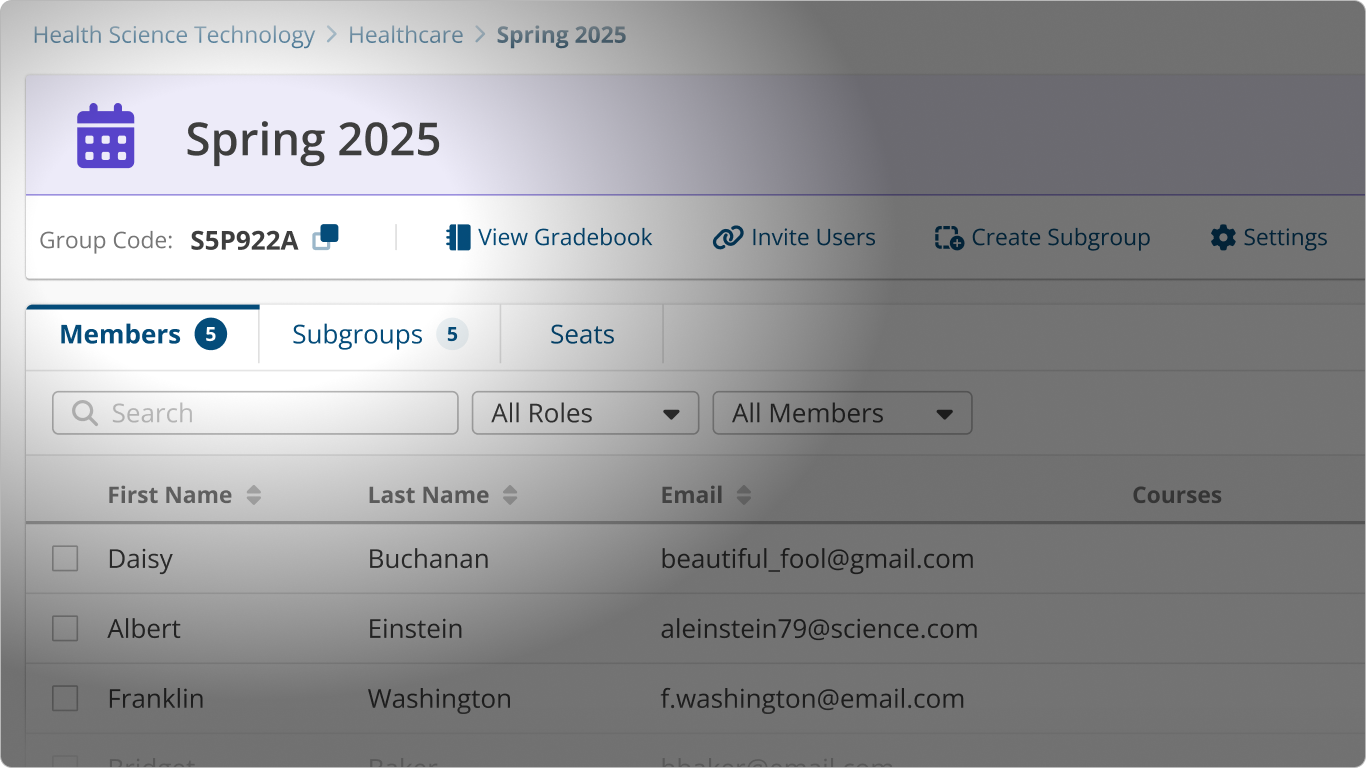
Note: To manage a subgroup, click on that subgroup name in the Subgroups Tab. You will be taken to the Manage Group page for that subgroup.
How do I add members to a group?
We provide several options for adding members to your group. You can:
- Allow users to request membership in your group via group code (Recommended), or
- Use the Add Members function to invite users (individually or via bulk upload) to join your group.
Using a Group Code
To add members via group code:
- Ensure students have a CareerSafe account (our Accounts and Passwords guide provides detailed instructions for account creation).
- Provide your group code (found in the Group Detail Card at the top of the Manage Group page) to users you’d like to add to your group.
- Users will appear in the Members Tab as “Pending” once they’ve entered the code in the Join Group Card on their own CareerSafe Campus Home page.
- You’ll need to approve their request to join the group, then enroll them in course(s) once they are members. View the Enrollment Guide for details on Approving/Enrolling members.
Adding Members
From the Manage Group page, click the Add Members button in Group Detail Card.
Note: When you navigate to the Manage Group page, you’re directed to top-level group you are an administrator of. To add members to a subgroup, navigate to that subgroup first via the Subgroups Tab.

Manually
- Select “Enter Manually” on the Add Members modal.
- Enter the First Name, Last Name, and Email Address of each person you want to add.
- Click “Add More” to add more rows.
- When you’re done adding user data, click the Continue button.
- A modal with a summary of member information will display. Users are not added or invited until you click the Add Members & Enroll button (or click “Add Members without Enrolling”) on this modal.
- The summary will display a count of members who will be added, as well as members who will be invited.
- Added
- Users can be added as Active group members if:
- they are already part of your organization, or
- they are new CareerSafe users.
- You can enroll these members right away.
- Users can be added as Active group members if:
- Invited
- Users must be invited to your group via email if they have existing CareerSafe accounts that aren’t affiliated with your organization.
- Invited users will receive an email letting them know you’ve invited them to join the group and will appear in the Members Tab as “Invited” until the user accepts your invitation.
- You won’t be able to enroll these users or modify their accounts until they accept the invitation.
Bulk Upload
- Select “Upload a File” on the Add Members modal.
- Download the Add Member template and fill in all the fields.
- Upload the completed template.
- Click the Next button once the file has successfully uploaded.
- A screen with a summary of member information will display. Users are not added or invited until you click the Add Members & Enroll button (or click “Add Members without Enrolling”) on this screen.
- The summary will display a count of members who will be added, as well as members who will be invited.
- Added
- Users can be added as active group members if:
- they are already part of your organization, or
- they are new CareerSafe users.
- You can enroll these members right away. View the Enrollment Guide for details.
- Users can be added as active group members if:
- Invited
- Users must be invited to your group via email if they have existing CareerSafe accounts that aren’t affiliated with your organization.
- Invited users will receive an email letting them know you’ve invited them to join the group and will appear in the Members Tab as “Invited” until the user accepts your invitation.
- You won’t be able to enroll these users or modify their accounts until they accept the invitation.
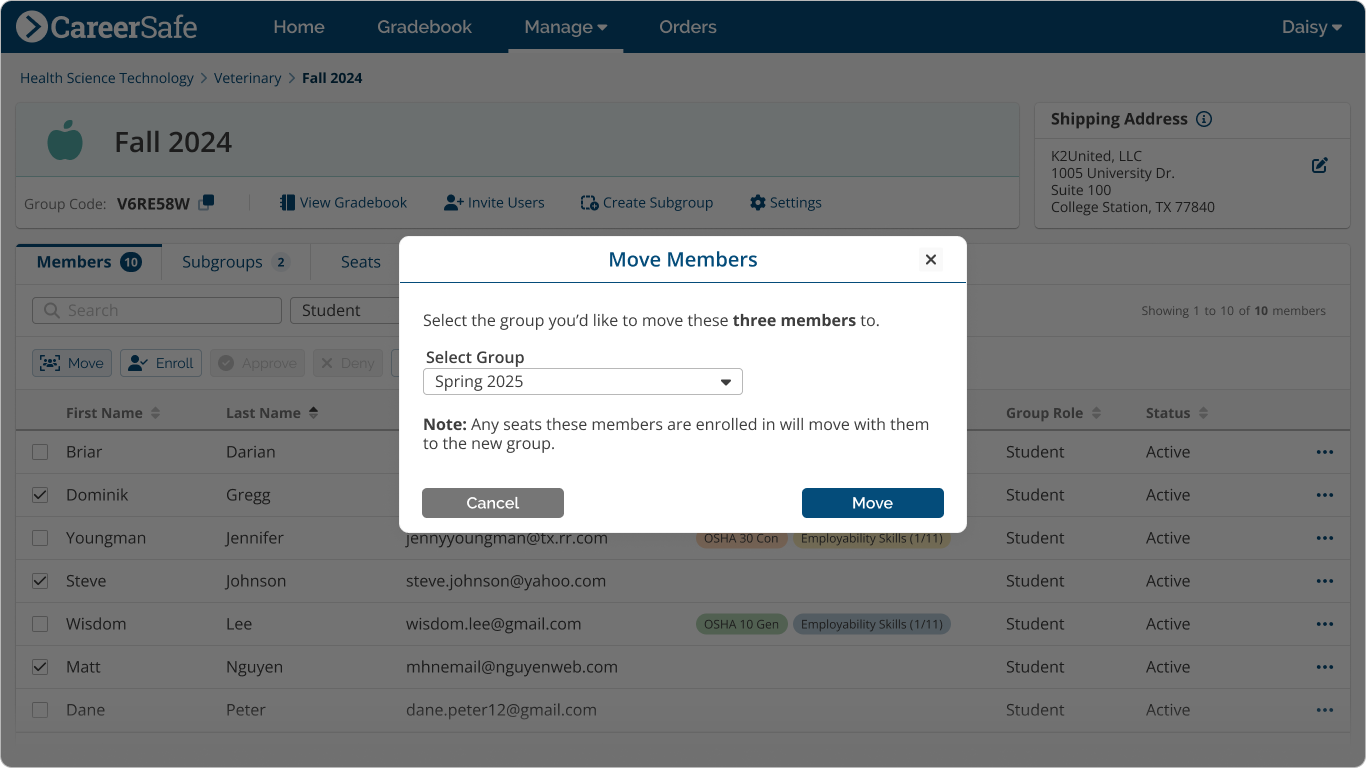
How do I move members to a different group?
From the Members Tab of the Manage Group page for the group the user is currently a member of:
- Select the checkboxes next to the names of the members you’d like to move.
- Click the Move button that appears above the Members table.
- Choose the group you want to move them to from the “Select Group” drop-down.
- Click the Move button
Note: If a student is enrolled in a seat when you move them to another group, the seat will move with that learner. Learn more about enrolling and unenrolling seats in our Enrollment Guide.
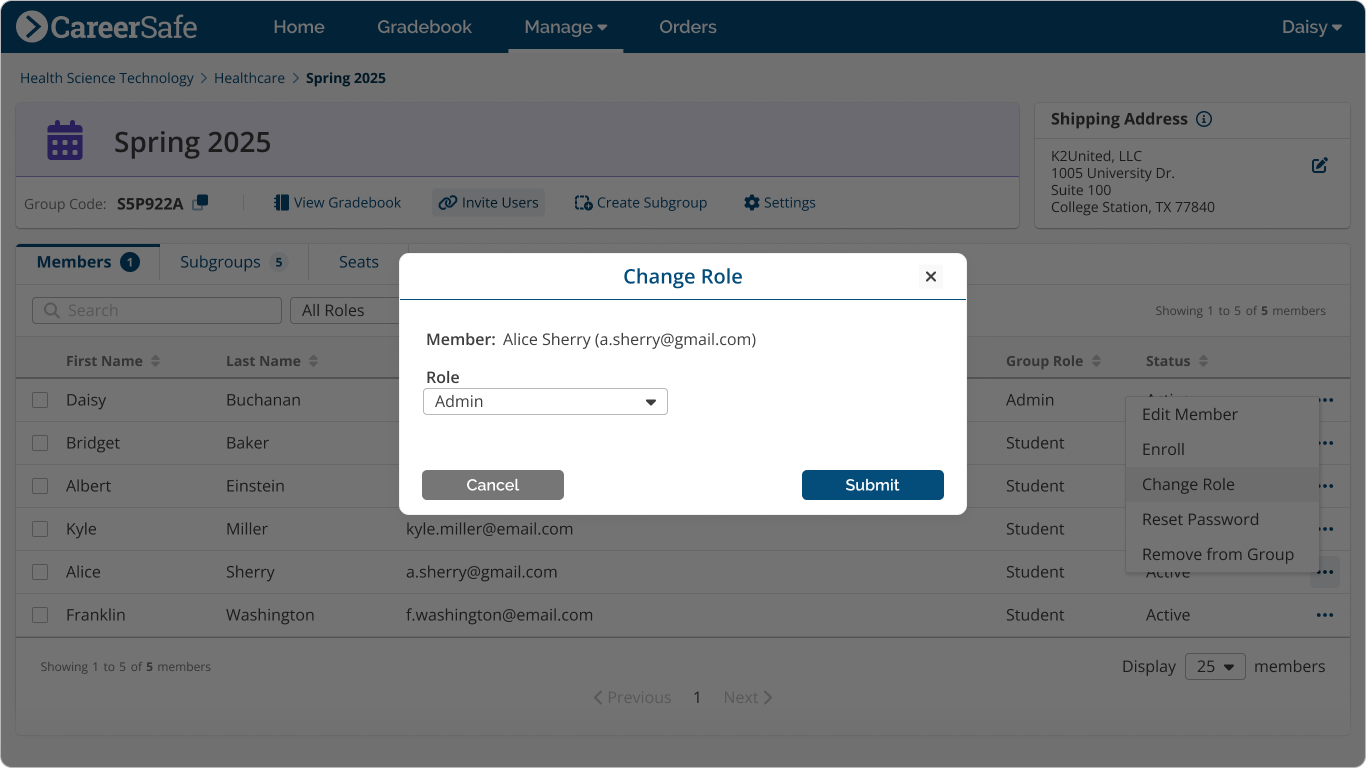
How do I change a member's group role?
If you need to change a member’s group role once you’ve added them to a group, you can do so from the Members Tab of the Manage Group page for the appropriate group:
- Click the More Actions icon () at the right end of the member’s row in the Member table.
- Click Change Role on the popover menu.
- The Change Role modal will display. Select the role you want the member to have from the drop-down menu.
- Click Submit.
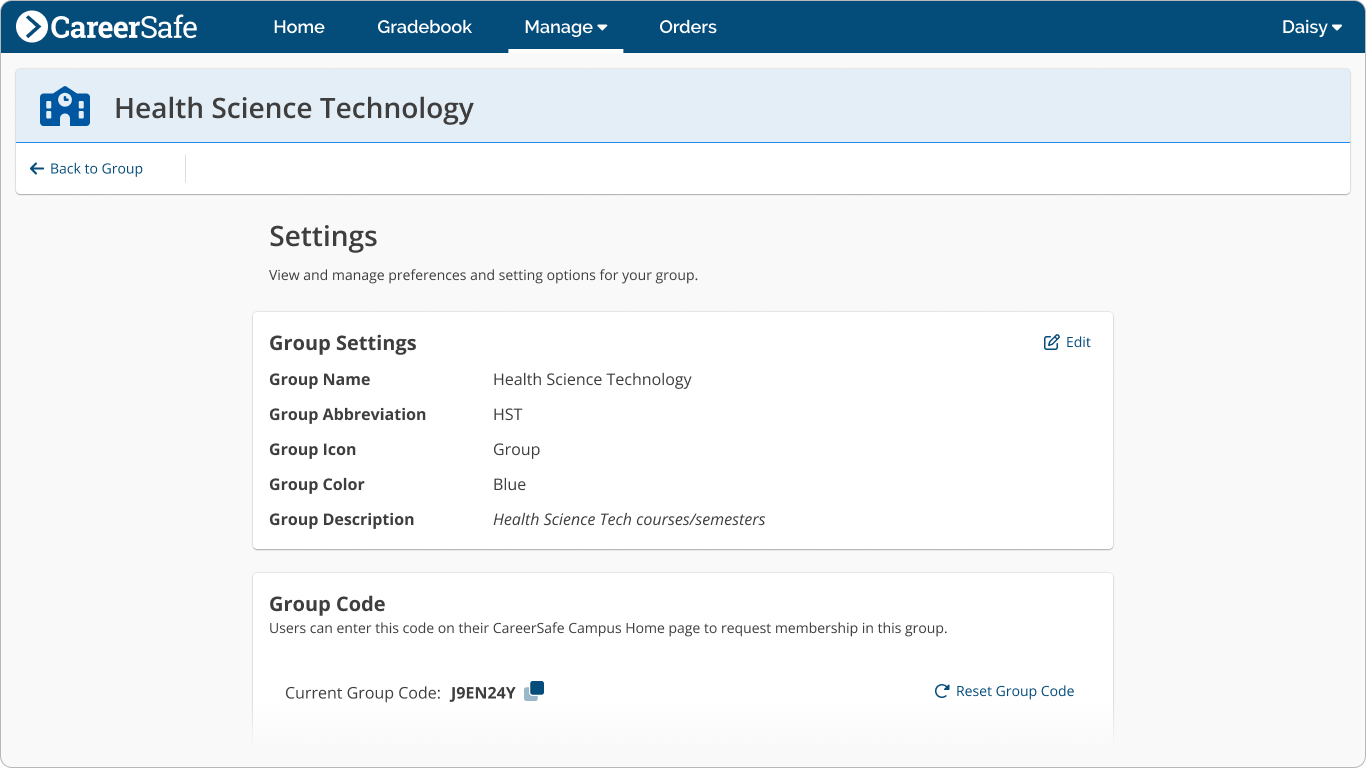
Settings Page
The Settings page displays the options selected when your organization or group was created. It also allows you to enable (or disable) course settings for your group.
To adjust these settings, click the Settings button in the Group Detail Card on your Manage Group page.
Note: For organizations, some settings will not be editable. Contact Customer Care to make changes to those settings.
What course settings can be set for the group?
Assessment Locking
As required by OSHA, students are only allowed three attempts at passing the Final Assessment for OSHA 10-Hour courses with a 70% or higher. If they fail all three attempts, they will have to restart the course from the beginning. The Assessment Locking feature allows instructors to prevent students from using their last Final Assessment attempt without approval.
Once you have enabled Assessment Locking, students who try to begin their third OSHA 10-Hour Final Assessment attempt will receive a notification informing them that the assessment is locked and they must contact their instructor before attempting the assessment again.
Note: The Assessment Locking feature does not function with third-party courses (e.g., OSHA 30-Hour Construction, HAZWOPER, and First Aid).
Student Time on Page (STOP)
When enabled by an instructor, the STOP (Student Time on Page) feature requires students to proceed linearly through our courses. This prevents students from moving forward until they have completed each page by either interacting with the activity or waiting for the audio to play in its entirety.